Core Data with CloudKit(二)——同步本地資料庫到iCloud私有資料庫
本篇文章中,我們將探討Core Data with CloudKit應用中最常見的場景——將本地資料庫同步到iCloud私有資料庫。我們將從幾個層面逐步展開:
- 在新專案中直接支援
Core Data with CloudKit - 建立可同步
Model的注意事項 - 在現有專案
Core Date中新增Host in CloudKit支援 - 有選擇的同步資料
本文使用的開發環境為
Xcode 12.5。關於私有資料庫的概念,請參閱Core Data with CloudKit (一) —— 基礎。如想實際操作本文內容,需要擁有Apple Developer Program賬號。
快速指南
在應用程式中啟用Core Data with CloudKit功能,只需要以下幾步:
- 使用
NSPersistentCloudKitContainer - 在
專案Target的Signing&Capablities中新增CloudKit支援 - 為專案建立或指定
CloudKit container - 在
專案Target的Signing&Capablities中新增background支援 - 配置
NSPersistentStoreDescription以及viewContext - 檢查
Data Model是否滿足同步的要求
在新專案中直接支援Core Data with CloudKit
在最近幾年蘋果不斷完善Xcode的Core Data模版,直接使用自帶模版來新建一個支援Core Data with CloudKit的專案是最便捷的入手方式。
建立新的Xcode專案
建立新專案,在專案設定介面勾選Use Core Data及Host in CloudKit(早期版本為Use CloudKit),並設定開發團隊(Team)
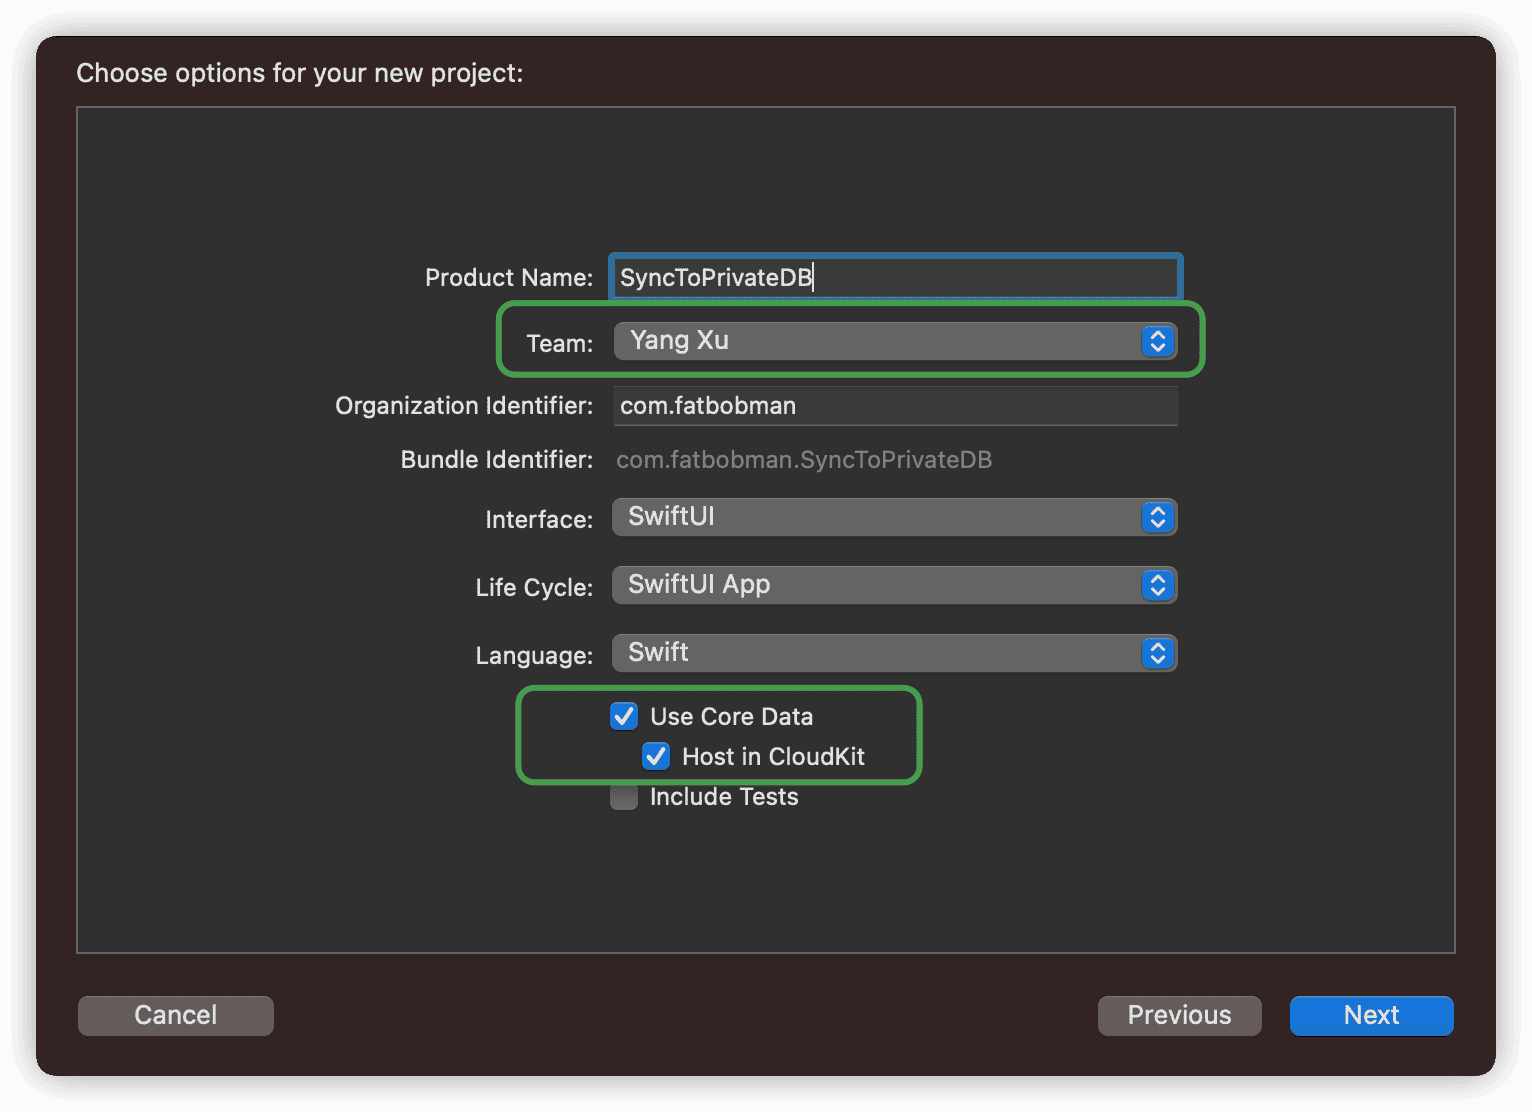
設定儲存地址後,Xcode將使用預置模版為你生成包含Core Data with CloudKit支援的專案文件。
Xcode可能會提醒新專案程式碼有錯誤,如果覺得煩只需要Build一下專案即可取消錯誤提示(生成NSManagoedObject Subclass)
接下來,我們根據快速指南逐步操作。
設定PersistentCloudKitContainer
Persistence.swift是官方模版建立的Core Data Stack。由於在建立專案的時候已經選擇了Host in CloudKit,因此模版程式碼已直接使用NSPersistentCloudKitContianer替代NSPersistentContianer,無需進行修改。
swift
let container: NSPersistentCloudKitContainer
啟用CloudKit
點選專案中對應的Target,選擇Singing&Capabilities。點選+Capability查詢icloud新增CloudKit支援。


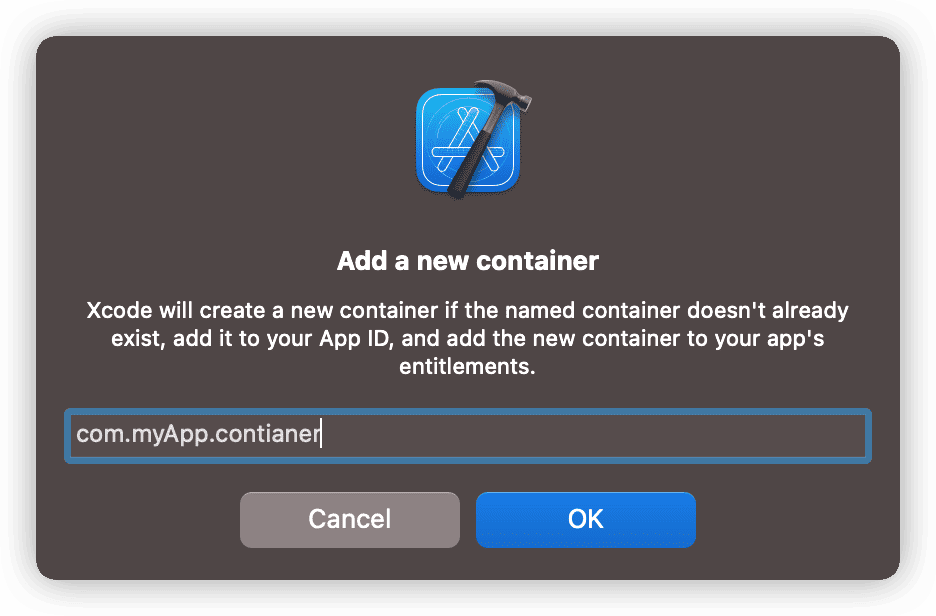
勾選CloudKit。點選+,輸入CloudKit container名稱。Xcode會在你CloutKit container名稱的前面自動新增iCloud.。container的名稱通常採用反向域名的方式,無需和專案或BundleID一致。如果沒有配置開發者團隊,將無法建立container。
在添加了CloudKit支援後,Xcode會自動為你新增Push Notifications功能,原因我們在上一篇聊過。
啟用後臺通知
繼續點選+Capability,搜尋backgroud並新增,勾選Remote notifications
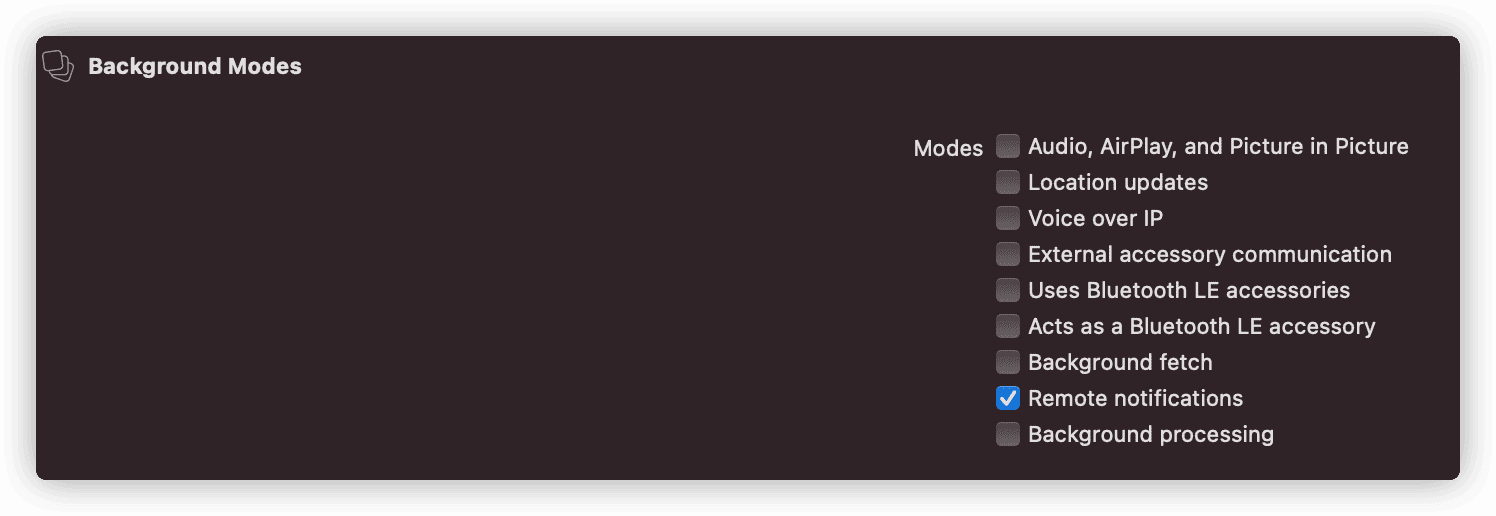
此功能讓你的應用程式能夠響應雲端資料內容變化時推送的靜默通知。
配置NSPersistentStoreDescription和viewContext
檢視當前專案中的.xcdatamodeld檔案,CONFIGURATIONS中只有一個預設配置Default,點選可以看到,右側的Used with CloudKit已經被勾選上了。

如果開發者沒有在Data Model Editor中自定義Configuration,如果勾選了Used with CloudKit,Core Data會使用選定的Cloudkit container設定`cloudKitContainerOptions。因此在當前的Persistence.swift程式碼中,我們無需對NSPersistentStoreDescription做任何額外設定(我們會在後面的章節介紹如何設定NSPersistentStoreDescription)。
在Persistence.swift對上下文做如下配置:
swift
container.loadPersistentStores(completionHandler: { (storeDescription, error) in
if let error = error as NSError? {
...
fatalError("Unresolved error \(error), \(error.userInfo)")
}
})
//新增如下程式碼
container.viewContext.automaticallyMergesChangesFromParent = true
container.viewContext.mergePolicy = NSMergeByPropertyObjectTrumpMergePolicy
do {
try container.viewContext.setQueryGenerationFrom(.current)
} catch {
fatalError("Failed to pin viewContext to the current generation:\(error)")
}
container.viewContext.automaticallyMergesChangesFromParent = true讓檢視上下文自動合併伺服器端同步(import)來的資料。使用@FetchRequest或NSFetchedResultsController的檢視可以將資料變化及時反應在UI上。
container.viewContext.mergePolicy = NSMergeByPropertyObjectTrumpMergePolicy設定合併衝突策略。如果不設定該屬性,Core Data會預設使用NSErrorMergePolicy作為衝突解決策略(所有衝突都不處理,直接報錯),這會導致iCloud的資料無法正確合併到本地資料庫。
Core Data預設了四種合併衝突策略,分別為:
- NSMergeByPropertyStoreTrumpMergePolicy
逐屬性比較,如果持久化資料和記憶體資料都改變且衝突,持久化資料勝出
- NSMergeByPropertyObjectTrumpMergePolicy
逐屬性比較,如果持久化資料和記憶體資料都改變且衝突,記憶體資料勝出
- NSOverwriteMergePolicy
記憶體資料永遠勝出
- NSRollbackMergePolicy
持久化資料永遠勝出
對於Core Data with CloudKit這樣的使用場景,通常會選擇NSMergeByPropertyObjectTrumpMergePolicy。
setQueryGenerationFrom(.current)這個是在最近才出現在蘋果的文件和例程中的。目的是避免在資料匯入期間應用程式產生的資料變化和匯入資料不一致而可能出現的不穩定情況。儘管在我兩年多的使用中,基本沒有遇到過這種情況,但我還是推薦大家在程式碼中增加上下文快照的鎖定以提高穩定性。
直到
Xcode 13 beta4蘋果仍然沒有在預置的Core Data with CloudKit模版中新增上下文的設定,這導致使用原版模版匯入資料的行為會和預期有出入,對初學者不很友好。
檢查Data Model是否滿足同步的要求
模版專案的Data Model非常簡單,只有一個Entity且只有一個Attribute,當下無需做調整。Data Model的同步適用規則會在下個章節詳細介紹。
修改ContentView.swift
提醒:模版生成的ContentView.swift是不完整的,需修改後方能正確顯示。
swift
var body: some View {
NavigationView { // 新增NavigationView
List {
ForEach(items) { item in
Text("Item at \(item.timestamp!, formatter: itemFormatter)")
}
.onDelete(perform: deleteItems)
}
.toolbar {
HStack { // 新增HStack
EditButton()
Button(action: addItem) {
Label("Add Item", systemImage: "plus")
}
}
}
}
}
修改後,可以正常顯示Toolbar按鈕了。
至此,我們已經完成了一個支援Core Data with CloudKit的專案了。
執行
在模擬器上或實機上設定並登入相同的iCloud賬戶,只有同一個賬戶才能訪問同一個iCloud私有資料庫。
下面的動圖,是在一臺實機(Airplay投屏)和一個模擬器上的執行效果。
視訊經過剪輯,資料的同步時間通常為15-20秒左右。
從模擬器上進行的操作(新增、刪除)通常會在15-20秒中左右會反應到實機上;但從實機上進行的操作,則需要將模擬器切換到後臺再返回前臺才能在模擬器中體現出來(因為模擬器不支援靜默通知響應)。如果是在兩個模擬器間進行測試,兩端都需要做類似操作。
蘋果文件對同步+分發的時間描述為不超過1分鐘,在實際使用中通常都會在10-30秒左右。支援批量資料更新,無需擔心大量資料更新的效率問題。
當資料發生變化時,控制檯會有大量的除錯資訊產生,之後會有專文涉及更多關於除錯方面的內容。
建立可同步Model的注意事項
要在Core Data和CloudKit資料庫之間完美地傳遞記錄,最好對雙方的資料結構型別有一定的瞭解,具體請參閱Core Data with CloudKit (一) —— 基礎。
CloudKit Schema並不支援Core Data Model的所有功能、配置,因此在設計可同步的Core Data專案時,請注意以下限制,並確保你建立了一個相容的資料模型。
Enitites
CloudKit Sechma不支援Core Data的唯一限制(Unique constraints)
Core Data的Unique constraints需要SQLite提供支援,CloudKit本身並非關係型資料庫,因此不支援並不意外。
swift
CREATE UNIQUE INDEX Z_Movie_UNIQUE_color_colors ON ZMOVIE (ZCOLOR COLLATE BINARY ASC, ZCOLORS COLLATE BINARY ASC)
Attributes
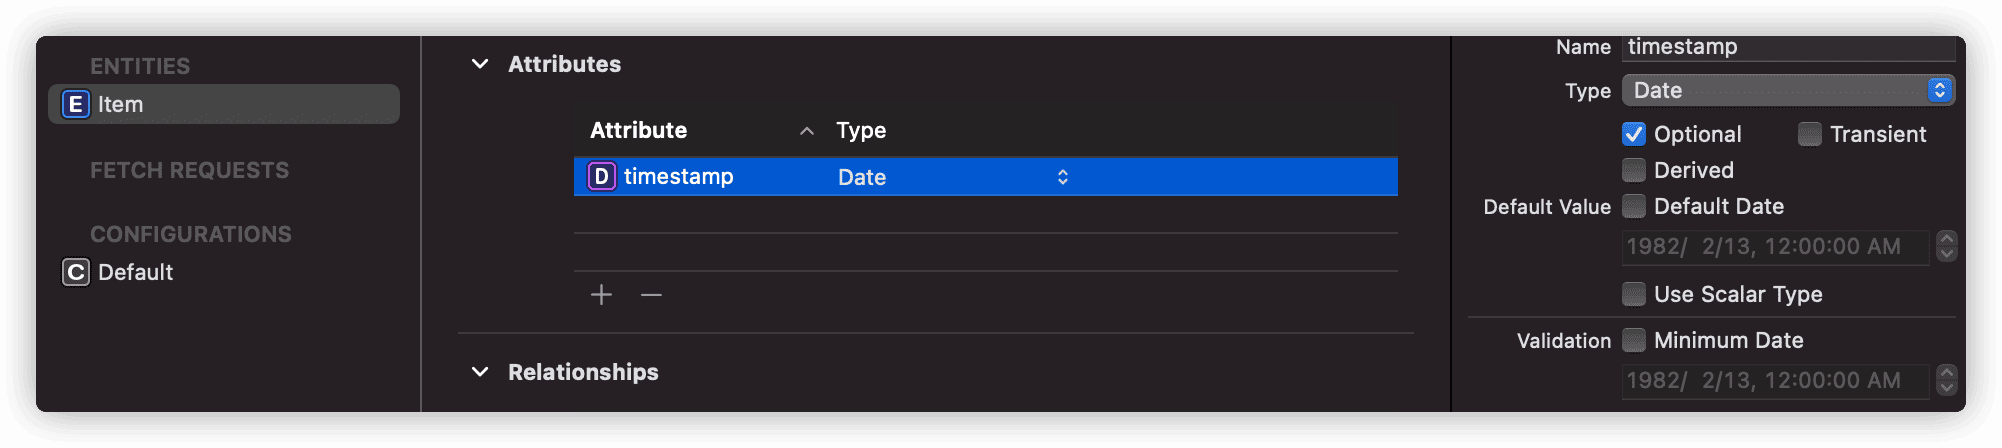
- 不可以有即為
非可選值又沒有預設值的屬性。允許:可選 、有預設值、可選 + 有預設值
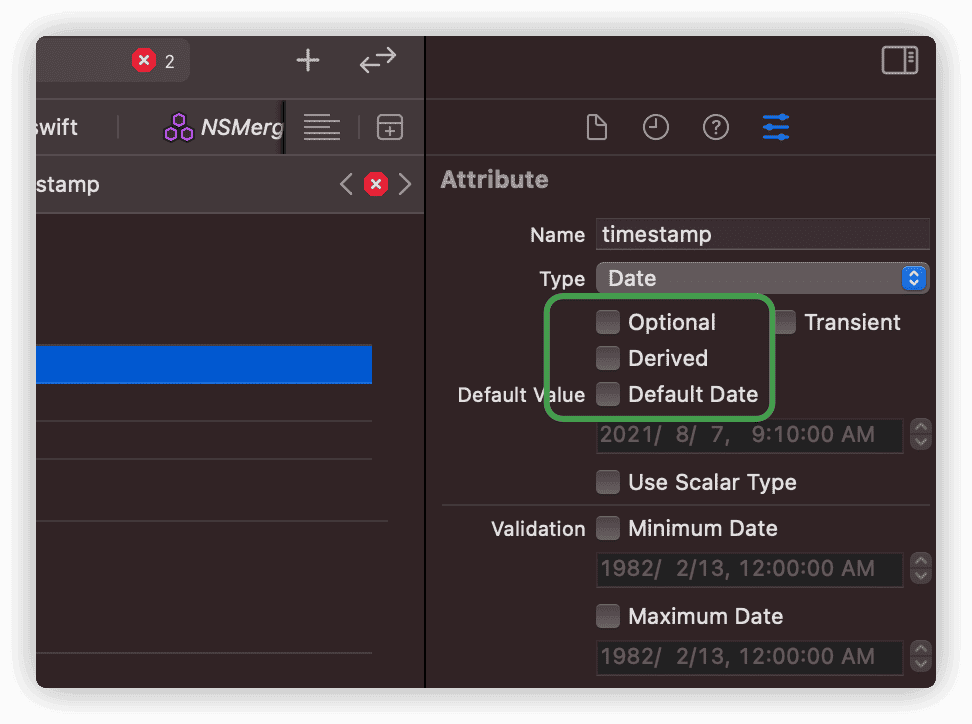
上圖中的屬性 非Optional 且 沒有Default Value是不相容的形式,Xcode會報錯。
- 不支援
Undefined型別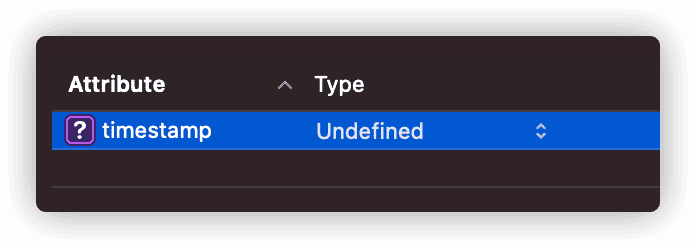
Relationships
- 所有的relationship必須設定為可選(
Optional) - 所有的relationship必須有逆向(
Invers)關係 - 不支援
Deny的刪除規則
CloudKit本來也有一種類似於Core Data關係型別的物件——CKReference。不過該物件最多隻能支援對應750條記錄,無法滿足大多數Core Data應用場景的需要,CloudKit採用將Core Data的關係轉換成Record Name(UUID字串形式)逐條對應,這導致CloudKit可能不會原子化(atomically)地儲存關係變化,因此對關係的定義做出了較嚴格的限制。
在Core Data日常始終中,多數的關係定義還是能滿足上述的要求。
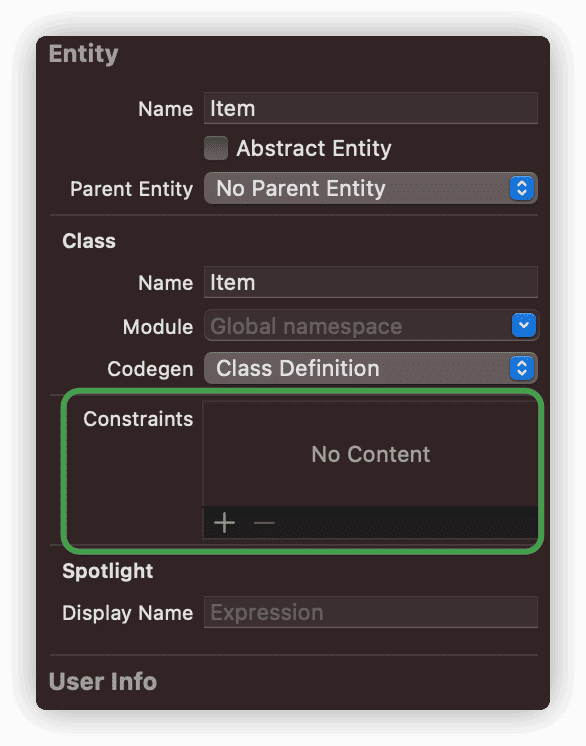
Configurations
- 實體(
Entity)不得與其他配置(Configuration)中的實體建立relationship
官方文件中這個限制我比較困惑,因為即使不採用網路同步,開發者也通常不會為兩個Configuration中的實體建立relationship。如果需要建立聯絡,通常會採用建立Fetched Properties。
在啟用
CloudKit同步後,如果Model不滿足同步相容條件時Xcode會報錯提醒開發者。在將已有專案更改為支援Core Data with CloudKit時,可能需要對程式碼做出一定的修改。
在現有Core Data專案中新增Host in CloudKit支援
有了模版專案的基礎,將Core Data專案升級為支援Core Data with CloudKit也就非常容易了:
- 使用
NSPersistentCloudKitContainer替換NSPersistentContainer - 新增
CloudKit、background功能並新增CloudKit container - 配置上下文
以下兩點仍需提醒:
CloudKit container無法認證
新增CloudKit container時,有時候會出現無法認證的情況。尤其是新增一個已經建立的container,該情況幾乎必然發生。
bash
CoreData: error: CoreData+CloudKit: -[NSCloudKitMirroringDelegate recoverFromPartialError:forStore:inMonitor:]block_invoke(1943): <NSCloudKitMirroringDelegate: 0x282430000>: Found unknown error as part of a partial failure: <CKError 0x28112d500: "Permission Failure" (10/2007); server message = "Invalid bundle ID for container"; uuid = ; container ID = "iCloud.Appname">
解決的方法為:登入開發者賬戶->Certificates,Identifiers&Profiles->Identifiers App IDs,選擇對應的BundleID,配置iCloud,點選Edit,重新配置container。

使用自定義的NSPersistentStoreDescription
有些開發者喜歡自定義NSPersistentDescription(即使只有一個Configuration),這種情況下,需要顯式為NSPersistentDescription設定cloudKitContainerOptions,例如:
```swift let cloudStoreDescription = NSPersistentStoreDescription(url: cloudStoreLocation) cloudStoreDescription.configuration = "Cloud"
cloudStoreDescription.cloudKitContainerOptions = NSPersistentCloudKitContainerOptions(containerIdentifier: "your.containerID") ```
即使不將Model Editor中的Configuration設定為Used with CloudKit,網路同步功能同樣生效
有選擇的同步資料
在實際應用中,有某些場景我們想有選擇性地對資料進行同步。通過在Data Model Editor中定義多個Configuration,可以幫助我們實現對資料同步的控制。
配置Configuration非常簡單,只需將Entity拖入其中即可。
在不同的Configuration中放置不同的Enitity
假設以下場景,我們有一個Entity——Catch,用於作為本地資料快取,其中的資料不需要同步到iCloud上。
蘋果的官方文件以及其他探討Configuration的資料基本上都是針對類似上述這種情況
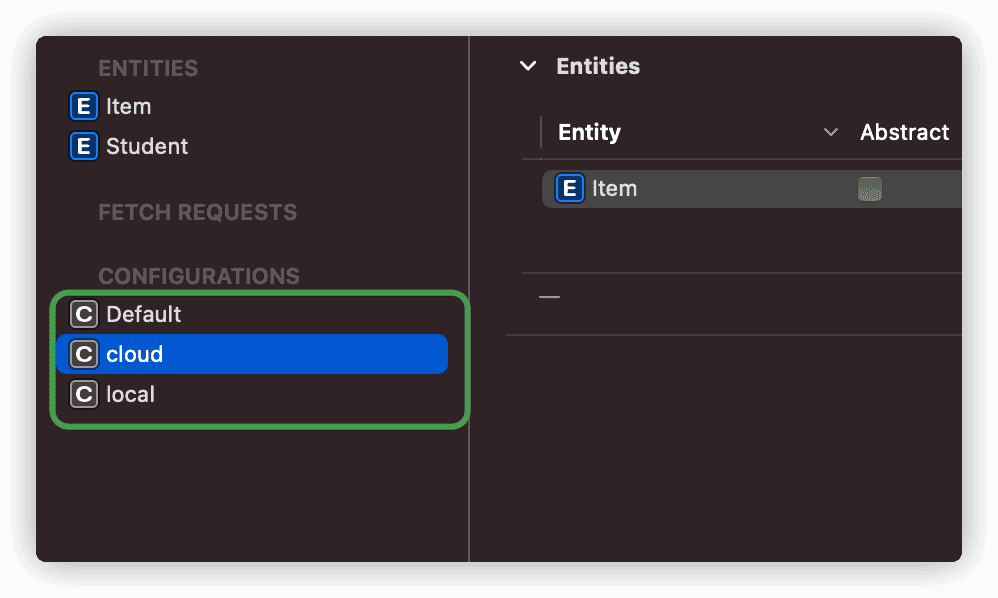
我們建立兩個Configuration:
- local——
Catch - cloud——其他需要同步的
Entities
採用類似如下的程式碼:
```swift let cloudURL = FileManager.default.urls(for: .documentDirectory, in: .userDomainMask).first! .appendingPathComponent("cloud.sqlite") let localURL = FileManager.default.urls(for:.documentDirectory, in:.userDomainMask).first! .appendingPathComponent("local.sqlite")
let cloudDesc = NSPersistentStoreDescription(url: cloudURL) cloudDesc.cloudKitContainerOptions = NSPersistentCloudKitContainerOptions(containerIdentifier: "your.cloudKit.container") cloudDesc.configuration = "cloud"
let localDesc = NSPersistentStoreDescription(url: localURL) localDesc.configuration = "local"
container.persistentStoreDescriptions = [cloudDesc,localDesc] ```
只有Configuration cloud中的Entities資料會被同步到iCloud上。
我們不可以在跨Configuration的Entity之間建立relationship,如確有需要可以使用Fetched Preoperties達到受限的近似效果
在不同的Configuration中放置同一個Entity
如果想對同一個Entity的資料進行同步控制(部分同步),可以使用下面的方案。
場景如下:假設有一個Entity——Movie,無論出於什麼理由,你只想對其中的部分資料進行同步。
-
為
Movie增加一個Attribute——local:Bool(本地資料為true,同步資料為false) -
建立兩個
Configuration——cloud、local,在兩個Configuration中都新增上Moive -
採用和上面一樣的程式碼,在
NSPersistentCloudKitContainer中新增兩個Description
當fetch Movie的時候,NSPersistentCoordinator會自動合併處理兩個Store裡面的Moive記錄。不過當寫入Movie例項時,協調器只會將例項寫到最先包含Movie的Description,因此需要特別注意新增的順序。
比如container.persistentStoreDescriptions = [cloudDesc,localDesc],在container.viewContext中新建的Movie會寫入到cloud.sqlite中
-
建立一個
NSPersistentContainer命名為localContainer,只包含localDesc(多container方案) -
在
localDesc上開啟Persistent History Tracking -
使用
localContainer建立上下文寫入Movie例項(例項將只儲存到本地,而不進行網路同步) -
處理
NSPersistentStoreRemoteChange通知,將從localContainer中寫入的資料合併到container的viewContext中
我目前沒有找到任何資料解釋為什麼協調器可以合併查詢多個Store中的同一個Entity,但在實際使用中確實可以實現預期中的結果。
以上方案需要使用Persistent History Tracking,更多資料可以檢視我的另一篇文章【在CoreData中使用持久化歷史跟蹤】。
總結
在本文中,我們探討了如何實現將本地資料庫同步到iCloud私有資料庫。
下一篇文章讓我們一起探討如何使用CloudKit儀表臺。從另一個角度認識Core Data with CloudKit。
本文原載於我的個人部落格肘子的Swift記事本。
文章也一併釋出在微信公共號:肘子的Swift記事本
其他推薦:
如何在Xcode下預覽含有Core Data元素的SwiftUI檢視
http://www.fatbobman.com/posts/uikitInSwiftUI/
- 自定義 Button 的外觀和互動行為
- MacBook Pro 使用體驗
- 用 SwiftUI 的方式進行佈局
- 聊一聊可組裝框架( TCA )
- StateObject 與 ObservedObject
- 一些適合 SwiftUI 初學者的教程
- iBug 16 有感
- 在 SwiftUI 中實現檢視居中的若干種方法
- SwiftUI 佈局 —— 尺寸( 下 )
- SwiftUI 佈局 —— 尺寸( 上 )
- SwiftUI 佈局 —— 對齊
- Core Data with CloudKit(三)——CloudKit儀表臺
- Core Data with CloudKit(二)——同步本地資料庫到iCloud私有資料庫
- 在CoreData中使用持久化歷史跟蹤
- 用 Table 在 SwiftUI 下建立表格
- SwiftUI 4.0 的全新導航系統
- 如何在 Core Data 中進行批量操作
- Core Data 是如何在 SQLite 中儲存資料的
- 在 SwiftUI 檢視中開啟 URL 的若干方法
- 為自定義屬性包裝型別新增類 @Published 的能力